Saturday, April 30, 2011

Day 120 and Bubbles


I've picked up my little toy knitting machine again!

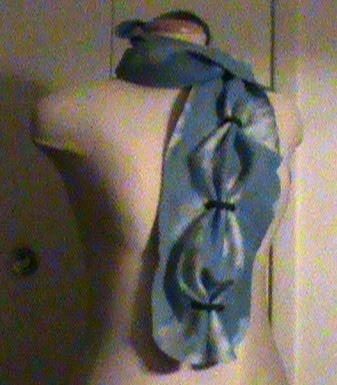
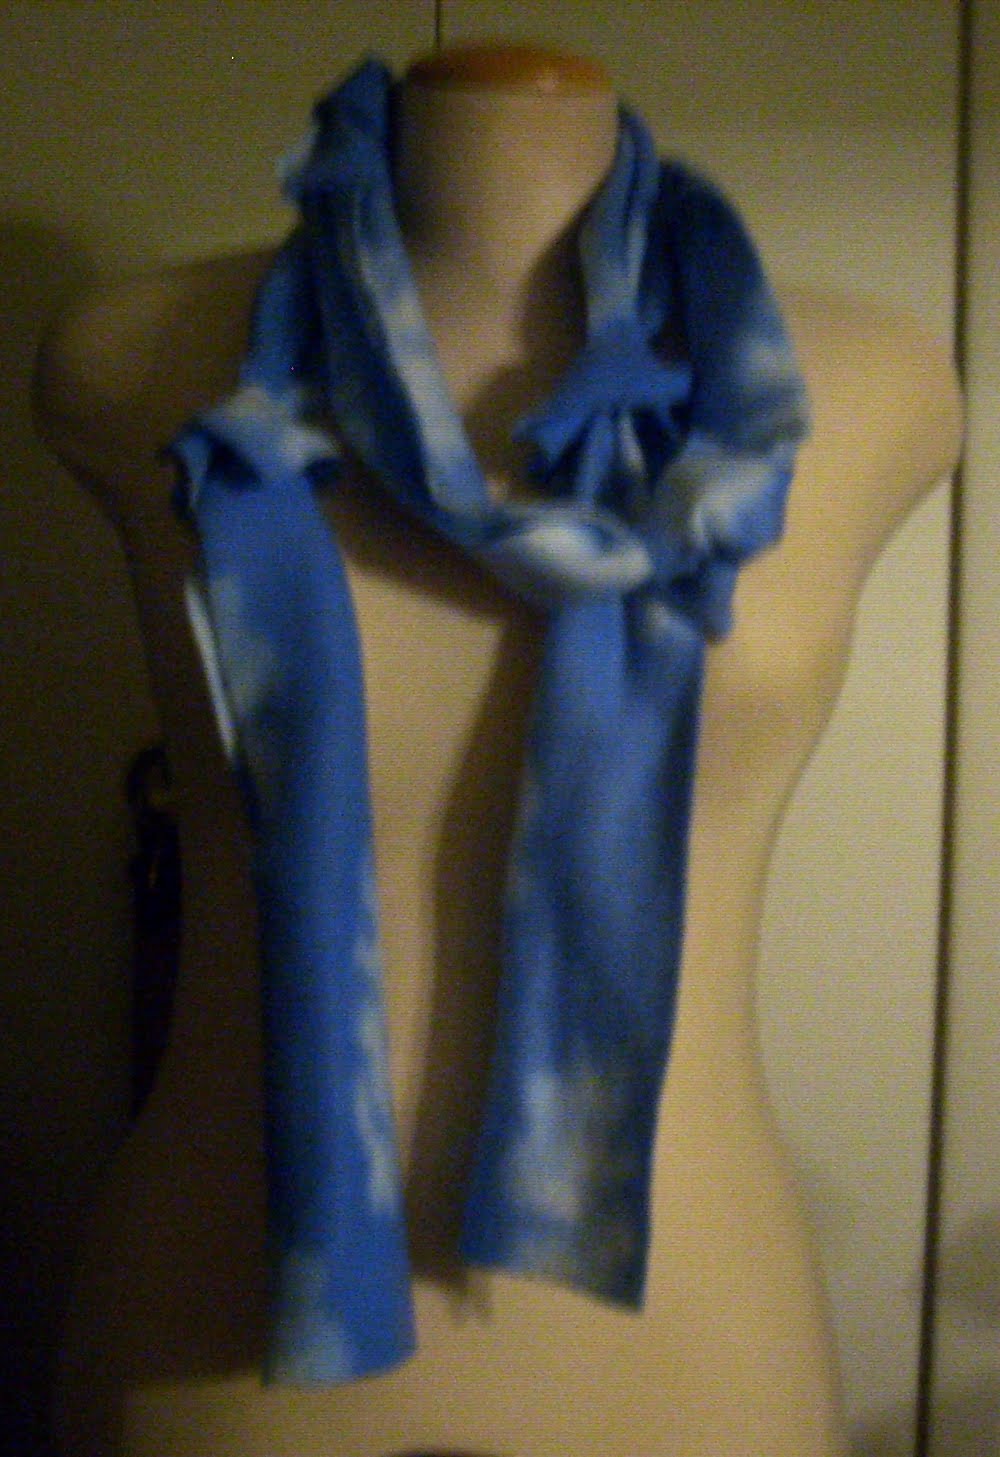
I still can't get it to make a flat panel, but I did make an interesting effect with the tube. I made it exactly as long as I wanted the scarf and then with a secondary yarn (I choose to match my color, but since you can't hardly see it, any color would be fine) and evenly spaced some running stitches. By pulling on those running stitches tightly, the tube squished up to make a very cute chain of bubbles or... well they would have looked like sausage links if it was in pink! If you were so inclined, you could even stuff those bubbles for a more substantial third dimension and a quilted feeling scarf. Call it hotdogs XD

It's a good thing I have a sense of humor or I could never live with my weird self :P

Friday, April 29, 2011

Day 119 and Doodles


I was hoping to make a scribbles style scarf with crochet, but I just couldn't get it to look right. However, using a thin yarn with a huge hook gives an interesting mesh that looks quite a lot like filet crochet. The loops all want to stretch out even though the scarf weighs practically nothing.

I suspect a shawl made in this way would not only be a fast weekend project, but even if you were to use cotton, wouldn't be that heavy at all!

Thursday, April 28, 2011

Day 118 and Latch Hook


Latch hooking is a totally different craft, and it's emulated here. It looks a little bit like insanity, butif you look carefully, you'll see a strip of crochet in the center. 2 rows of filet netting provided a soft gridded base for this scarf reminiscent of the canvas even weave which provide the base for latch hooked rugs. The canvas is far too stiff and uncomfortable to be wearable so the crochet substitution is very much a necessity.

With a thin simple base in hand, the rest is fringing. With traditional latch hooking, every single row of even weave is given a fringe. This makes a shag rug and since every yarn is placed by hand, interesting patterns can be made. If you feel up to such a task, make your filet grid the appropriate size for your gridded pattern and just latch hook every row onto it in the pattern you desire. I decided not to be so in depth this time around and used very very long lengths of fringe and filled only the edge of my filet crochet. It's a little bit crazy, but it's really quite comfortable and there's no doubt that it's flashy!

Wednesday, April 27, 2011

Day 117 and the Wrap


A cowl can be joined in many different ways. Instead of just putting the ends of a rectangle together, try joining an end to an edge for this very classy pointed collar.

If you're not sure how long to make your rectangle, it's actually a really easy formula.
Length of the rectangle minus width needs to equal the target circumference (I think 22 inches is a good number to aim for so that it comfortably stretches over your head).

For this exact scarf, I used size 15 needles, 25 stitches and knit in moss stitch for about 36 inches before sewing. The yarn I used I don't think is being made any more (Jaeger Michelle) but it was a light worsted with a halo.

Tuesday, April 26, 2011

Day 116 and Holding Hands


Hey Hey Hey! It turns out I have not exhausted my ideas for the ever versatile, ever speedy, fingerknitting! This time around I made a few strips and carefully counted my rows so that each of the strips would be even. Then with a larger sized trusty crochet hook, I used a single crochet, chain one pattern to connect the strips of fingerknitting.

The look is very different from other finger knitting ideas. Usually each strip curls into something that looks like I-cord, but when crocheted together and forced to stay open, there is an interesting laddering effect.

Monday, April 25, 2011

Day 115 and Accessorize


So I decided that I could do another less plain jean scarf. Same thing, but with some decorations thrown on. I like to make my decorations on pins so I can wear as few or as many as I want and I can pin them on after I've arranged my scarf. Then if I want I can move them to other scarves, it's a cinch.

Incidentally all of the flowers and the butterfly were patterns that are demonstrated on youtube. All I did was turn on the demos and start crocheting along. For many of them I didn't even have to pause to catch up as they were stitched in real time.

Sunday, April 24, 2011

Day 114 and Estonia


This is one of my absolute favorite pattern books is Knitted Lace of Estonia. The history is interesting, the patterns are gorgeous, and the techniques used span from simple to very complex lace with fascinating little bobbles called nupps. This particular pattern has no nupps, but look forward to seeing them much later in the year.

Saturday, April 23, 2011

Day 113? and Double Hearts


Double knitting is perfect for the indecisive. One side is the exact opposite color congifuration of the other.

Sorry for the short post. It's time to spend Easter with my family. :)

Friday, April 22, 2011

Day 112 and Ladders Part 2


The same effect can be made a couple of different ways in crochet. Last time a sing crochet anchored each side of a chain length. This time the scarf was made width-wise and the ladder portions were made with an oversized crochet hook and treble crochet stitches (those would be double trebles in Europe) which are quite long and can easily mimic chains.

It's just another way the same end can be reached by two different roads :)

Thursday, April 21, 2011

Day 111 and Sitting Pretty


I shamefully admit that not every pair of jeans I own fits me. I decided to go ahead and donate this one to the scarf cause. A pair of pants as it turns out has a LOT of fabric real estate! I cut all the way across the center front of each leg and the center back of each leg which essentially cuts out the crotch of the pants, but as a full piece of fabric lays very nearly flat. It looks a little too clean and neat for my taste right now, but a couple of runs through the washing machine and it'll look much shaggier on the edges because denim tends to fray a bit.

I'm more of a clean cut girl myself, but if you like big gashes and slashes, get out that razor blade and hack your scarf just like you hacked your jeans in high school!

Wednesday, April 20, 2011

Day 110 and Practice


I know I've said it before and it still stands. I don't enjoy swatching. I might be a little impatient, but I always want to get started on my project NOW! So here's a way to make a swatch and also a project so I can compromise. I had 4 different yarns here and 2 of them would definitely be considered novelty yarns. Two were a kind of chenille and the other 2 had a strong halo. I had hoped to put a slight pattern in what I used them for and so with this little scarf I practiced.

It turn out that pattern in these strange yarns looked like mistakes, but showed up beautifully in the bulky halo yarns. I did find that one of the chenilles was rather sticky, which seemed to me a perfect attribute for a keyhole to hold the end of the scarf in place. The other chenille yarn was a little bit heavy so I finished the scarf with it so as to weight down the end and be a nice drape.

The textures are very interesting together and I have to admit that swatching is useful. Bah. haha!

Tuesday, April 19, 2011

Day 109 and Endless


So you want to make a striped cowl. What's that? All those ends to darn in have you dreading it? Well, I say "WHY BOTHER??" This was a short cowl done on straight needles. Any size needle and any size yarn would work as long as you like the way they look together and as long as you plan on cutting after every single row. I knitted or purled changing the stitch on a whim and cut after each row letting the ends hang unprotected. When I was done and had bound off, I folded the whole thing in half and each of the like ends were knotted together. It created an interesting corner and by cutting the fringe on an angle it accentuated this corner.

If you don't like purling, but still want the look, do this on a circular needle and push all the stitches around. If you're fearful of the stitches coming undone, do it in the round and tie off each end as you go. If you do it in the round you could also start your new row in a random spot so that you'd have fringey ends all around your cowl. This also makes a great inexpensive project because you can dive into your stash and each row takes very little yardage.

Monday, April 18, 2011

Day 108 and Blocked


Sometimes you just need a good old color block scarf. You have scraps, they look good together, use them up. Honestly, sometimes they don't look good together and then you can call it your ugly scarf and you'll love it more than you think you could.

I happen to be awash with fun fur that I don't particularly enjoy. On size 17 needle and 17 stitches, quick work was made. A size L hook and about 12 stitches would give the same effect in crochet. To be totally honest, I use knots when working with fur. You can't see them, you can't feel them, and no one will be the wiser!

Sunday, April 17, 2011

Day 107 and the Fox


These two natural colors together remind me of the lush fur stoles that ladies used to wear back in the day though now they are politically incorrect. This one happily enough uses plant fibers and manmade fibers and is therefore animal friendly! Dare I say it, perhaps it is even more comfortable.

You'll also recognize fun fur as a part of this scarf. I was hoping to show yet another way that it can be used without being the exact same all fur scarf that beginners love and advanced yarnheads have being sadly unused. It's just enough fur to be flashy, but not so much as to be overwhelming.

The entire scarf was made with 2 strands held together. For the first row of double crochet, one strand of fur and one strand of a lovely cotton wool blend are used. For the 2nd, 3rd, and 4th rows, it's 2 strands of the blend. For the final row it's once again one strand of each. Especially in crochet it's important to blend the fur with something else so the fluffiness doesn't get matted down.

Saturday, April 16, 2011

Day 106 and Belted


Sometimes a scarf can have multiple uses. This was a very easy filet crochet made extremely wide and with only 2 rows. Cotton yarn makes it perfect for warmer weather and if it's too warm, it doubles as a belt or a headband too.

Chain for as long as you'd like your scarf. There's no need to count. Double crochet in the 6th chain, then chain one and double crochet in every other chain all the way across. If you had one extra stitch at the beginning, just pick it out. It's easier than counting. For the second row, chain 4, double crochet in the next double crochet, then chain one and double crochet in each dc until the end.
I added 2 fat fringes to mine, but I think a tassle on each end would look great too.

Friday, April 15, 2011

Day 105 and Scribbles


The technique has been around forever, but I think it was the Mason Dixon Girls who created the term scribbles to describe it.

When you take very very thin yarn (I used crochet cotton) and use very very large needles (size 17!) you see every single stitch. You not only see the stitch, you see right through it and everything behind it as well!

If you also take a thicker yarn and use it for just one row, the wiggly pattern of a row of knit stitches becomes very highlighted. I love the result and I recommend you try it out too!

Here's my tip for one row of a color change: When you finish that row, don't cut off either of the yarns. Slide your knitting from one needle to the other so that your original yarn is now in the working position. Trying to darn in ends on such open work can be a nightmare and this will help you do less darning.

Thursday, April 14, 2011

Day 104 and the Ladder


This scarf is a different take on an earlier stitch pattern. Chaingang was crocheted longways, and Ladder is the result when the same stitch is done vertically. The fantastic surprise is how very differently the two scarves lay. While chaingang was bunchy but stayed flat, ladder folds and lets the chains flop about like loops. It's fascinating to me!

Choose your yarn and a hook one size larger than you'd ordinarily use.

Chain 10. SC into second chain from hook, Chain 7, SC into final chain.
Every Row: Chain 1, Turn. SC into first SC, Chain 7, SC into next SC.

Do this until you're happy with the length or you've run out of your chosen yarn. Darn in your ends and be fascinated by the interesting folding and bunching this scarf makes!

Wednesday, April 13, 2011

Day 103 and the ZigZag


Hello! I'm just your basic crochet chevron stopping by for a visit. I zig here and zag there and my points aren't sharp at all, so you'll have fun wearing me.

-----

I'm being weird and I'm okkay with that.

Tuesday, April 12, 2011

Day 102 and the Spring Ascot


I'm not even sure if I have the terminology right. In my mind an ascot is a short scarf that is held around the neck by tying a loose knot. I'm of course picturing Freddy and Daphne from Scooby Doo here. They probably had solid polyester scarves made of fabric rather than knits, but I'm thinking this knit would probably have been why more comfortable for either of them.

This yarn is definitely out of production, but any thin tape yarn in cotton or cotton/linen blend would give the same effect.

1 ball Primavera by Giovanni
Size 15 needles
Tapestry needle
Gauge is not important, but keep your stitches loose to make the P3tog's easy.

Cast on 21
Row 1: K1, *YO, P3tog, YO, K1* Repeat to the end.
Row 2: P2tog, *YO, K1, YO, P3tog* Repeat to last 5 sts, YO, K1, YO, P2tog.
Repeat these 2 rows until you have only 2 yards of yarn left. It doesn't matter which row you end on.
Bind off.

Monday, April 11, 2011

Day 101 and Boa Love


Similar effect as Boa but a very different way of getting there. This is once again the Solomon's or Love Knot stitch. Here instead of completing a mesh or some sort of flat pattern, the single stitch is continued over and over and over again, then worked back with just single crochet stitches. In this way, two knots are bunched together, but separate from the knots beside them making little fluffed full fringe elements.

---------------------

In other news, I'm not liking this video camera as a regular camera. It takes good video, but photos are too small and too grainy. Time to try again.

Sunday, April 10, 2011

Day 100 and Open


Warm weather means lightweight scarves. One of my favorite fibers to use when it's hot out is linen. My other favorite is cotton. Happily enough, I have a blend!

The yarn I used was lace weight, but 4 strands together made a lovely heavy worsted and with my jumbo hook and a double crochet, this was finished in no time at all. A big hook with a less than big yarn makes for a loose open fabric without any special technique knowledge. Hold onto the base of your stitches to make pulling that first yarn over through a little easier. I made this cowl long enough to double.

Saturday, April 9, 2011

Day 99 and the Spike


Here's an easy one. Yes yes, all my scarves are easy. It's a fact! Easy is fast 90% of the time and I've only a single day in which to create. Granted, I do have a handful of longer term scarves I'm working on little by little every day... but I'm rambling now.

Spike stitch is a great way to overlap colors in crochet without having to strand or carry 2 yarns at once. By performing an elongated single crochet by dipping the first preparation yarn over 2 or more rows below the previous row, a large spike overlaps those rows adding color far below the current row.

1 ball each Loops and Threads Cotton in Black and Tan
Size K hook
Tapestry needle to sew in ends.

Chain 182.
Row 1: DC in 4th chain from hook and all following chains.
Row 2-4: Chain 3, turn, DC in second and every following stitch including the beginning chain which represents a stitch.
Row 5: Change to second color. SC 2, Spike stitch 2 rows below
Rows 6-8: Same as 2-4.
Cut yarn, and pull through final loop sewing in any loose ends.

I love this dark color combination because it's so elegant, but this is also a good method to make team colors scarves or use holiday colors for a speedy gift.

Friday, April 8, 2011

Day 98 and the Crunch


I'm running out of titles! haha! Anyway, it's fun to make combination scarves. Using more than one craft makes one feel very versatile.

This was an easy one. Again you'll need to know how to graft an icord to itself, but essentially that's it! Take a piece of fleece the size that you'd like and round the ends. Fold it in half lengthwise (or hot dog style if you remember elementary terms) and the in half in the other direction to find the center. Cut two holes big enough to slip the icord through. The holes should be equally spaced from the center as from the edges of the scarf and lined up with each other. Space out four more pairs of holes in both directions for a total of 9 pairs down the length of the scarf.

Thread the i cord through the holes and graft them to make closed rings. How wide the rings are depends on how much crunching together you'd like in the fabric. I did a few different lengths so that it's squished at different tensions throughout. I also like to balloon out the fabric to emphasize the effect.

Thursday, April 7, 2011

Day 97 and the Lace Base


There's a type of lace that you can buy at any fabric store which has large eyelets either at the top, the bottom or right smack dab in the center. As far as I can tell it's specifically made for threading a skinny ribbon through and using both the lace and the ribbon together as a trim. Well, there are plenty of other things you can thread through the holes or around the posts in this case.

I did some trial and error and decided that a size H crochet hook with some worsted weight yarn was perfect. I imagined the eyelets as stitches and crocheted around the post between them. In this case a single crochet around the post followed by a chain repeated gave a very gently ruffled result which I quite liked.

It seemed too simple and as the lace was a scrap, it was a bit short. In order to utilize the length, I thought a nice lariat with a cute flower as the ring would be perfect. A couple leaves here and there and I'm happy with the result!

Spring Cleaning! ... More to come... ugh.

BEFORE:
Really? Just a box full of yarn? No rhyme or reason at all.
More boxes? And plastic shopping bags? Really?
Are those hanging strands? That's just a sad sorry tangle waiting to happen!

I am not now nor have I ever been a particularly tidy person. Yet even I have to admit that a little bit of organization goes a long way towards inner peace. Thanks to the inspiration of one Argus Filch of Hogwarts fame, I picked myself up, dusted myself and my pantry units off, and started organizing.

Kevin and I have both long called this the "yarn tower" and rightly so. It is the tallest thing in our apartment. Literally 3 inches more height at it will be holding up the ceiling. It's a bit intimidating.

How did I do it? ZIPTOP BAGS! They are a miracle. Not only do they keep yucky things off the yarn, but they hold the yarn in tidy groups and you can press some of the air out to make the yarn more compact. Genius. Anyway it took a solid 12 hours of work to get it from that up there... to this down here!
Good lord I can even see the floor again! Hallelujah! Not all of it fit I must admit. I ended up hiding away some roving (I don't know how to spin yet) in the closet and since we have a flat screen now, I placed a couple boxes of "iffy" yarn back in that empty space where the not flat screen used to take up. Those iffy yarns may or may not be hitting the road. Only time and my very whims will tell.

Wednesday, April 6, 2011

Day 96 and Diamonds


This is a rather crude first try at a stitch pattern that I made up as I went along. I feel that it needs adjusting in a couple places, but that's the fun of designing, right? Love it or fix it.

This scarf used one skein of Caron Victorian Christmas Gold in Green, but I don't think it's a yarn that I would use again for a wearable piece. It had a stiffness and a slightly rough texture against the skin. I think it would be very well suited for a placemat or a tree skirt, but not a real skirt!

Tuesday, April 5, 2011

Day 95 and the Tassel


I definitely need to download myself a pdf writer. This one was easy to make, but complicated to write out a pattern. When I manage to translate my notes and when I learn to contribute on ravelry, I'll make this one a download. :)

As far as specs, this is a crochet piece and there are large clusters that form dimensional bobbles all the way around. They remind me of the black leather punk neck pieces with spikes, but in blue and snowy fluff, the scary is completely taken away. The real focal point though is the giant tassel that acts as the button for this keyhole style scarf. The novelty yarn was looped many times around a set length but the ends were not cut. Leaving them looped prevented the novelty yarn from unraveling. The top of the tassel was crocheted and the loops were packed into the head.

I love the style and will definitely make another for myself.
Special thanks going out to Stacey from The Original Yarn Salad for being so awesome and gifting me with a huge amount of yarn for this project!

Monday, April 4, 2011

Day 94 and the Escape Route


By now you're probably wondering just how much more of this blue sky with clouds fleece does this woman have?? I swear to you it was just a remnant! The fact that remnants can last so darn long is a testament to the fact that you really can find good deals in the bargain basement!

If you've ever watched a cartoon or a farce of an escape movie, and I'm sure you have, then I expect you've seen the traditional escape line of a row of bedsheets tied at the corners and used as a rope out some window somewhere. Now if I really just tied a bunch of short ends together I would have ended up with some pretty large, hard, and uncomfortable knots. Instead I used a very simple loop technique which give the illusion of knots but leaves the "knot" supple and comfortable.

First, cut a small slit near the end of each of two pieces that will be connected and place one piece on your left and one on your right.
Second, thread the left fabric through the slit in the right fabric.
Third, feed the opposite end of the right fabric through the slit in the left fabric.
Repeat all three steps in a chain until you've worked as long a scarf as you'd like. This also works very well with jersey knit (t-shirt) and anything other fabric that doesn't unravel. You could also knit or crochet pieces with a large slit or hole near the ends and weave them in the same way.

Sunday, April 3, 2011

Day 93 and Tim Burton


I had originally hoped to have made this scarf even longer, but one of the restraints of the challenge I've given myself is the demand for at least one scarf every single day. I cut it short just to meet my deadline.

To me, nothing says grim but whimsical, smart but ridiculous, funny but scary more than Tim Burton. He directed such classics as Sweeney Todd, The Nightmare Before Christmas, and Beetlejuice and in all three you'll find an example of grim fashion necessity, the evenly spaced black stripes. (On a separate but related topic, Burton films make for fun knitting games. There are a number of key features that can be found in many and sometimes all of his films which would be a terrific set up for a trigger. Learn more about game knitting with leethal)

This scarf is essentially the Oneone once again, but with two colors taking turns every two rows. This way the opposite color can easily be trailed up the edge of the work and is relatively unnoticeable. I recommend this with any number of color combinations.

Saturday, April 2, 2011

Day 92 and Check Yourself


In some ways this is another type of granny stitch as double crochets are worked into chain spaces. I think of it as a checkerboard in which the checks can be as wide and long as you'd like them to be. Following is a very easy scarf recipe and it's only 5 rows wide.

Check Yourself:
Size K crochet hook
heavy worsted yarn 3 oz
Tapestry needle

Chain 98 (or to change the length, any multiple of 10+8)
Row1: DC in 4th and all following chains. Turn
Rows 2: Chain 3 (counts as first DC in this and all rows) DC in second stitch and next 8 stitches. *Chain 5, skip 5 stitches, DC in next 5 stitches* Repeat until only 5 stitches are left in the row and DC into each one (final stitch is in the chain since it counts as a DC) Turn
Row3: Chain 3, DC in second stitch and next 8 stitches. *5DC in chain space, Chain 5* Repeat until no chain spaces remain. Omit final chain 5 and DC in every stitch to the end. Turn
Row4: Chain 3, DC in second stitch and next 8 stitches. *Chain 5, 5DC in chain space* Repeat until no chain spaces remain. DC in every stitch to the end. Turn
Row5: Chain 3, DC in second and every following stitch, 5DC in every chain space. Cut yarn and tie off.

Weave in your ends and consider yourself golden. If you wanted to make this wider, just repeat rows 3 and 4 until you're happy with the width finishing with row 5 as normal.

2 Winners! February and March

I hope to continue to have one giveaway a month to relieve my ever growing collection of scarves.
Our winners during my game of catchup:
I typed in each name by hand into Random.org 's list feature and above are the results.

February's winner gpmonkey, Congratulations! Head over to the side bar and click through all the posts for February for the scarf you would like to have as your own.


March's winner penguinlover, Congratulations! Make your way to yonder side bar and click through all the posts for March to find the scarf you'd like to keep.

Upon returning home from work, I'll be sending emails to each of you!
Thanks to those who gave it a whirl! Stop by next month for another chance to win... well shoot, stop in every day so you can see the many scarves you might be able to claim as your own!

Friday, April 1, 2011

Day 91 and the Unwearable Scarf ... April Fools!


Call it a joke. Call it an art piece. Call it what you will, but it still falls under my guidelines of scarfitude! (A) It goes round the neck. (B) It either keeps one warm or decorates...decorate is a loose term here. I do find the slight pooling of color rather interesting!

Why is it unwearable? Because it's probably the least comfortable material one would ever attempt to put against the skin. It's plastic. Grocery bags or other flexible plastic cut into thin strips make what is known in the fiber community as "Plarn." I've made plenty of it myself and also posted 2 quick tutorials back in the day on making the stuff.

Most folks who use plarn at all would use it for rugs, purses, market bags, and sculpture. Every now and then you might see a "wearable" art piece and quite often they are rather spectacular. I don't know if the designers do something special to make the material softer or if they line it or if the models simply suffer, but as for this scarf, well... yeah...

April Fool!

Not you, but ME!! I've been keeping up this blog on a regular basis for a few months now and as a result I spend a bit of time reading other people's blogs.

It's so foolish of me that I've only been keeping the list in my blogger dashboard when I could easily be sharing the list of enjoyable blogs I read with other readers. The way I figure it, if I like it and you like me, then maybe you'll also like what I like. At least, that's the way it seems to go when I'm off reading other blogs.

Off to the right you'll see a section which is a list of links to other crafty, nerdy, fun, funny, ecologically sound, or just plain interesting blogs and sites that I visit and recommend. I won't sit here and do it all in one go, but a handful at a time there will be new recommendations.

If you think you and I have similar tastes, leave a comment to your blog or a blog that you like so that I might continue expanding my circle.